
Overview

The Holy Bible Recovery Version mobile application has six main sections that enable users of the App to access all its features:
Table of Contents and Annotations
Table of Contents and Annotations page has three main views:


- Table of Contents
- Annotations
- Bookmarks
Table of Contents
The table of contents view enables users to navigate to specific books, chapters, or verses in the Recovery Version of the Holy Bible. This view in the Table of Contents and Annotations page provides options of displaying the books of the Bible as a list or as a grid, and users are given the option of turning Verse Selection on or off.
The table of Contents view

Switching between the table of contents list and grid views

Tap on the list view icon or the grid view icon to change the way that the table of contents is displayed.
Turning on and off verse selection

To turn off verse selection when navigating to a location in the App, you can select a book and tap on the "vv." verse selector toggle icon to the top right of the chapter list. When the icon is blue, verse selection is enabled; when it is grayed out, verse selection is disabled.
Annotations
The annotations view of the Table of Contents and Annotations page gives users the ability to view and search through annotations created on verses either from one tab or from all tabs at once.
The annotations view

- Searching for annotations
- Filtering annotations
- Editing annotations
- Deleting annotations
Bookmarks
The bookmarks view in the Table of Contents and Annotations page allows users to view bookmarks created in the Reader page.
The bookmarks view

Going to a bookmark from the bookmarks view

- Tap on a bookmark card to go to the bookmarked location in the reader view
Deleting bookmarks from the bookmarks view


- Tap on the triple dot icon of a bookmark card to see menu options
- Tap "Delete bookmark"
Reader
The Reader page is the heart of the application where users can view the text, footnotes, cross references, and outlines of the Recovery Version. This page allows users to make annotations (tags and notes) on verses, create bookmarks to mark their location, and navigate through their reading history. The Reader page houses a host of other features such as the ability to change the appearance of the reader (dark, sepia, and light modes), adjust font sizes and line spacing, change fonts, and turn off footnotes and cross references or display them as plain text.
The reader page


Header bar buttons: Table of Contents, previous chapter, chapter info, next chapter, search.

Footer bar buttons: back, forward, Tabs, font and features, settings.
Viewing footnotes and cross references


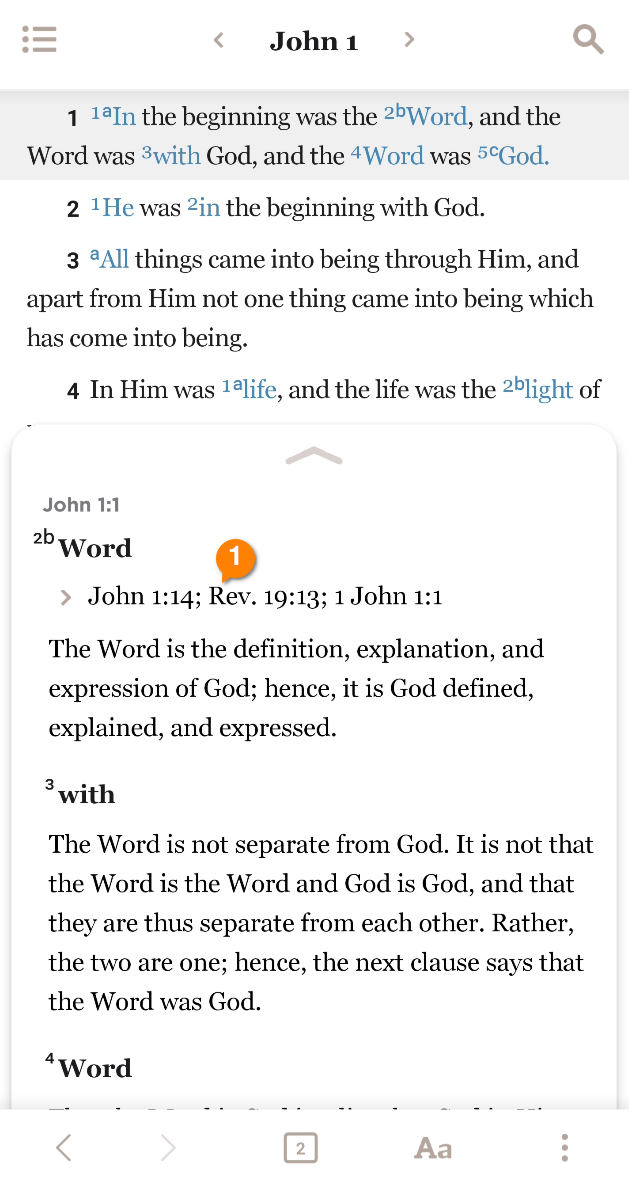

- Tap on a word with a footnote or cross reference to view the contents of the footnote
- Tap on a list of cross references in the footnote drawer to expand them
- Tap on an expanded cross reference to navigate to its location
Viewing verses and footnotes embedded in a footnote


- In the footnote drawer, tap on a verse reference or a footnote to see a preview of the verse or footnote
- Tap the verse or the footnote in the preview to navigate to it.
Copying a verse


- Long-press on a verse
- Tap the copy button in the menu that pops up
Sharing a verse

- Long-press on a verse
- Tap the share button in the menu that pops up
- Select the app that you wish to use to share the verse
Adjusting the font size
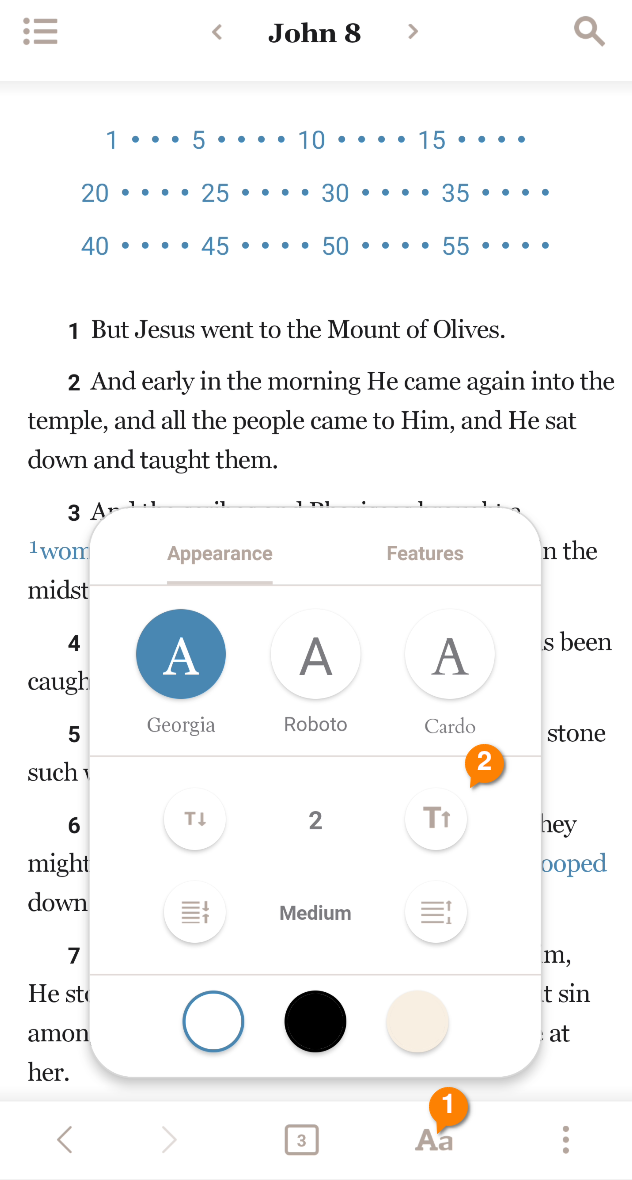
- Tap the font and features button
- Use the font adjustment buttons in the Appearance tab to increase and decrease the font size
Adjusting the line height

- Tap the font and features button
- Use the line spacing adjustment buttons in the Appearance tab to increase and decrease the line space
Changing fonts

- Tap the font and features button
- Select one of the available fonts in the Appearance tab
Changing color themes

- Tap the font and features button
- Select one of the three available themes (at the bottom) in the Appearance tab
Turning on and off footnotes and cross references

- Tap the font and features button
- Select the Features tab
- Turn on or off the “Show superscripts” switch
Turning on and off display of user annotations
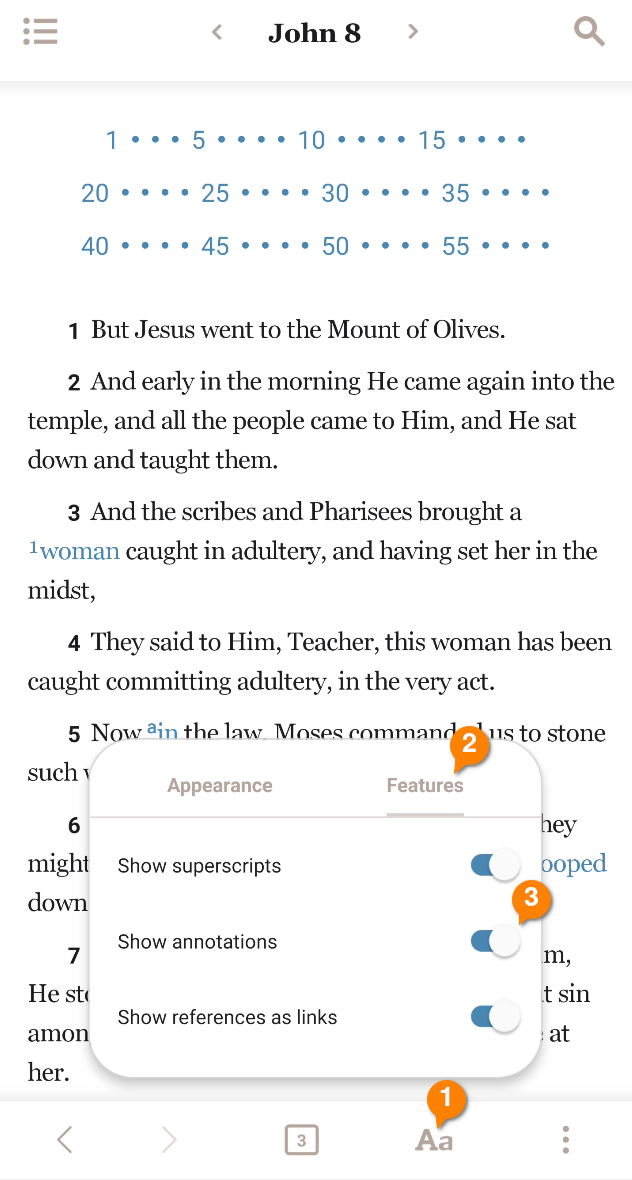
- Tap the font and features button
- Select the Features tab
- Turn on or off the “Show annotations” switch
Change footnote and cross-reference word links

- Tap the font and features button
- Select the Features tab
- Turn on or off the “Show references as links” switch
Multiple verse selection

- Long-press on a verse
- After the menu pops up, you can expand or reduce your selection by tapping on another verse
Create a note


- Long-press on a verse
- Tap the add note icon in the menu that pops up
- Compose a note
- Tap the save button to see a preview of the note
- Tap outside of the preview to dismiss the preview and return to the reader
Create a tag


- Long-press on a verse
- Tap the add tag icon in the menu that pops up
- Type in a tag name
- Tap on the tag created or found in the “Suggestions” section to add the tag
- Tap the save button to see a preview of the tags added to the verse
- Tap outside of the preview to dismiss the preview and return to the reader
Create a bookmark


- Tap on a verse number to create a bookmark at that verse
Highlight a verse

- Long-press on a verse
- Tap on a highlight color in the menu that appears
Edit a note


- Long-press on an underlined or highlighted verse that contains a user-created note
- Tap the note in the preview menu that pops up
- Modify the note
- Tap the save button to see a preview of the modified note
- Tap outside of the preview to dismiss the preview and return to the reader
Remove a tag from a tagged verse


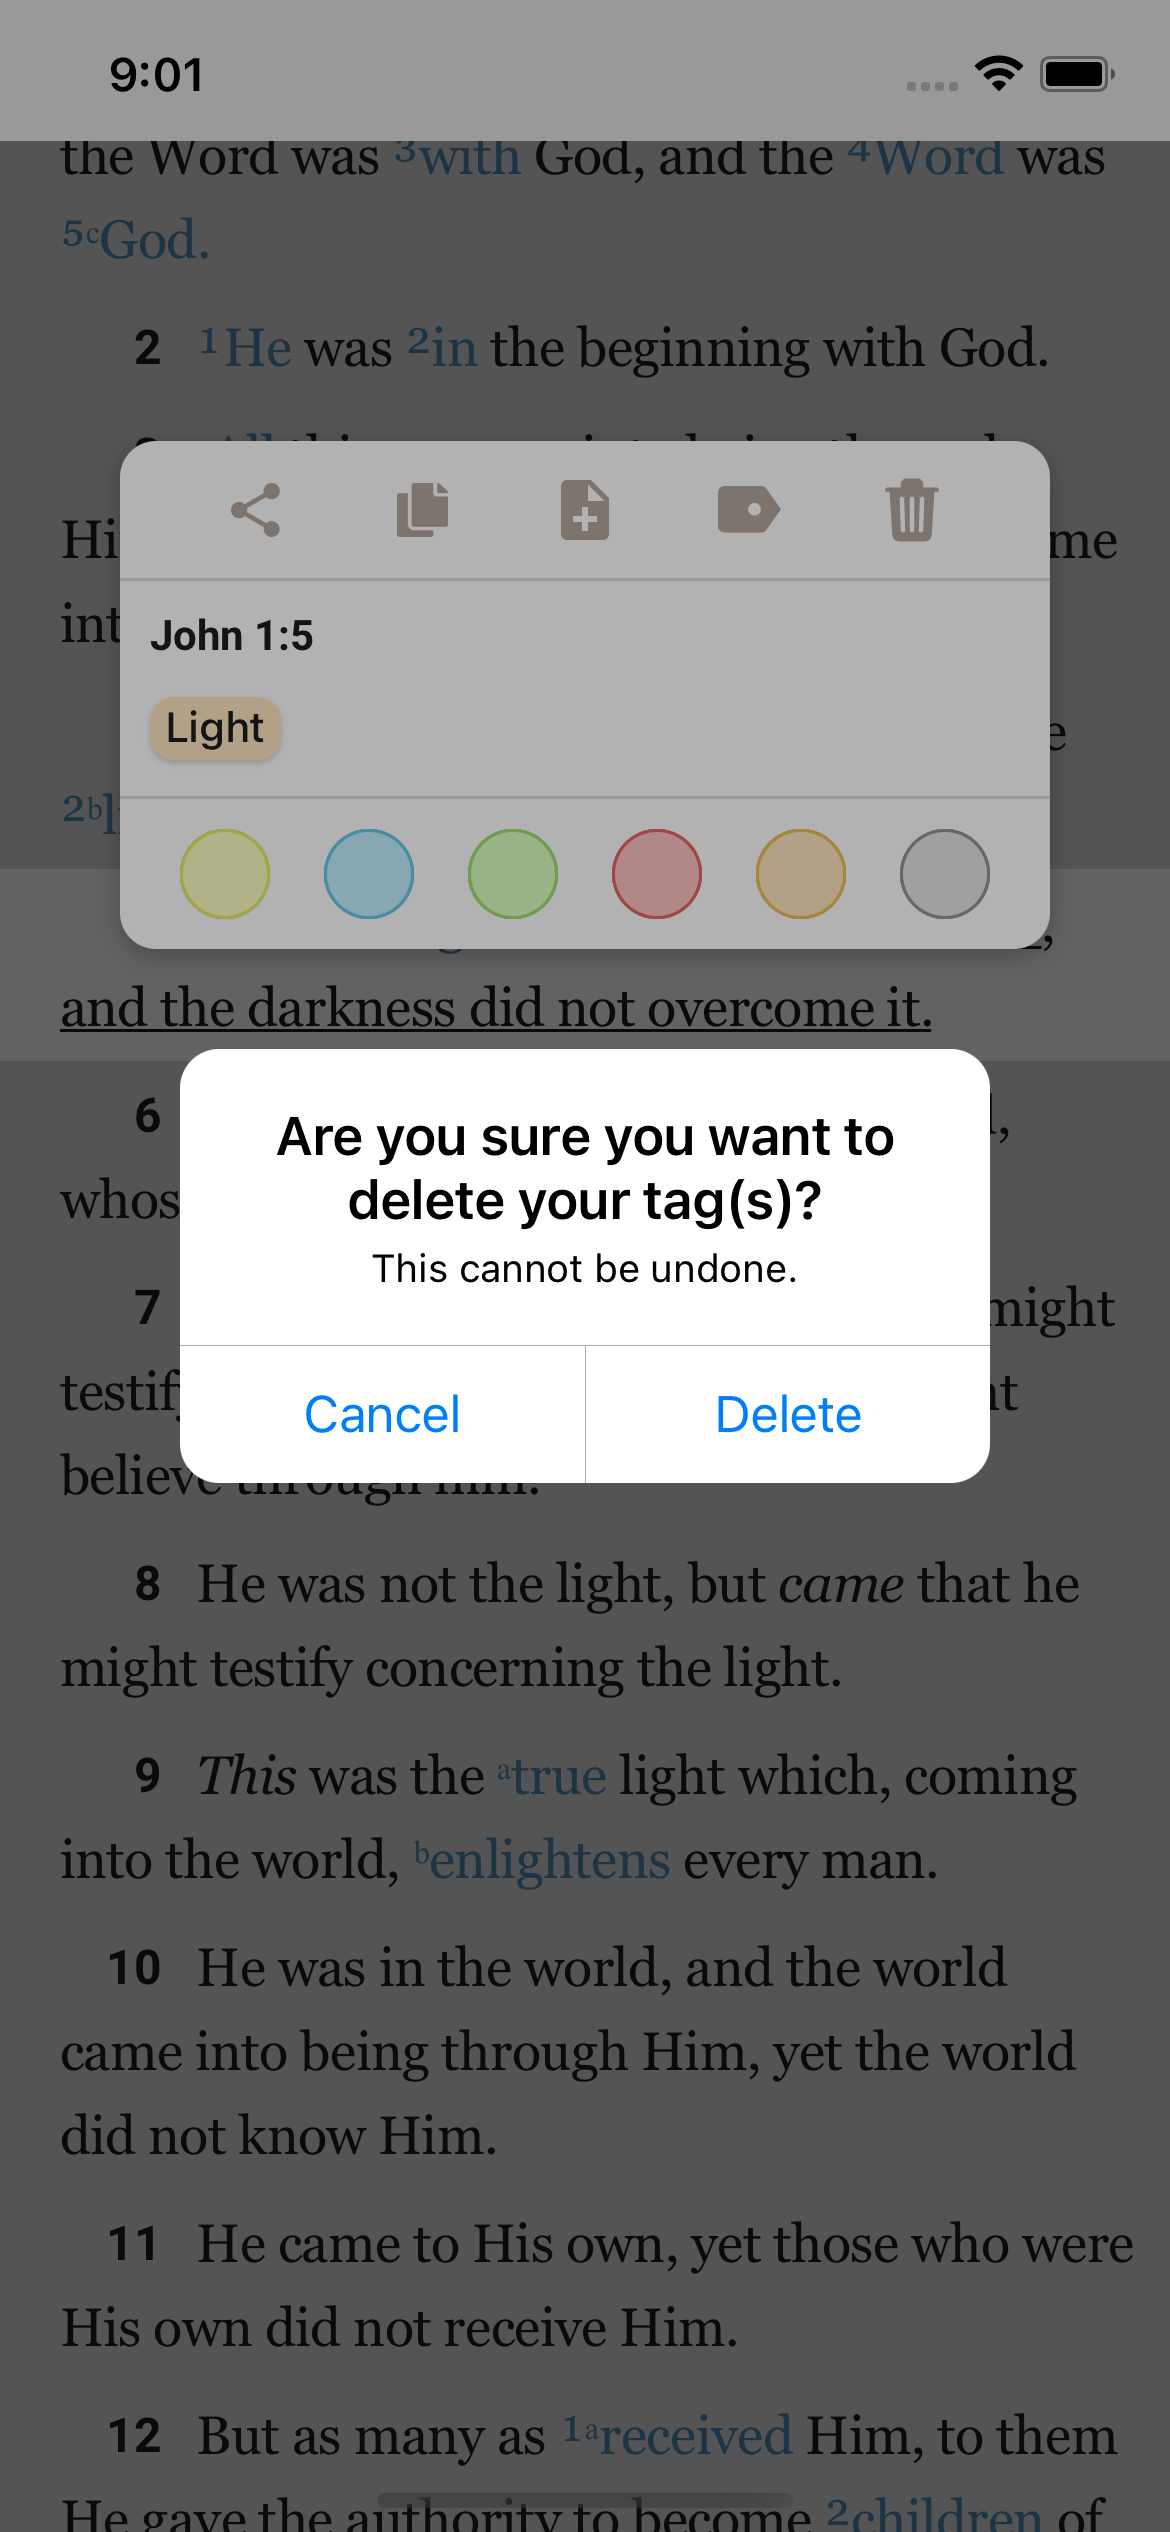
- Long-press on an underlined or highlighted verse that contains a tag
- Tap the tag in the preview menu that pops up
- Remove associated tags by tapping on them in the selected tag list
- Tap the save button to see a preview of the modified tag
- Tap delete on the confirmation dialog
Change a highlight color

- Long-press on a highlighted verse
- Tap on an alternative highlight color in the menu that appears
Delete a bookmark


- Tap on a verse number of a bookmarked verse to remove the bookmark.
Delete a note

- Long-press on an underlined or highlighted verse that contains a user-created note
- Tap the note in the preview menu that pops up
- Tap the delete icon
- Tap outside of the preview to dismiss the preview and return to the reader
Delete a highlight
- Long-press on a highlighted verse
- Tap on the highlight color with the check mark to remove the highlight
Delete all annotations on a verse

- Long press a verse with annotations.
- Tap the delete icon in the preview annotation display
Search
From the Search page users are able to search for verse references or words in the Recovery Version text or footnotes. Searches and results can be filtered, and they can be limited to a book or a group of books in the Bible.


- The search page:
- verse search
- footnotes search
- Searching for verses
- Searching through footnotes
- Advanced: using filters and changing search behavior
Profiles
Profiles enable users to have multiple copies, or instances, of the Recovery Version for various purposes, each complete with its own annotations, bookmarks, and navigation history. For instance, a profile can be created for personal daily Bible reading, another can be created for the study of a particular topic through the Bible, and yet another can be created for prayer and fellowship over the Bible. In each case (profile), the user-generated notes, bookmarks, and navigation history are preserved. The Profiles page allows users to create and manage (rename, pin, archive, or delete) profiles.
The profiles page:

Create a profile
- In the profile page, tap on the plus icon in the top right corner
- Enter a name for the profile and tap save
Rename a profile
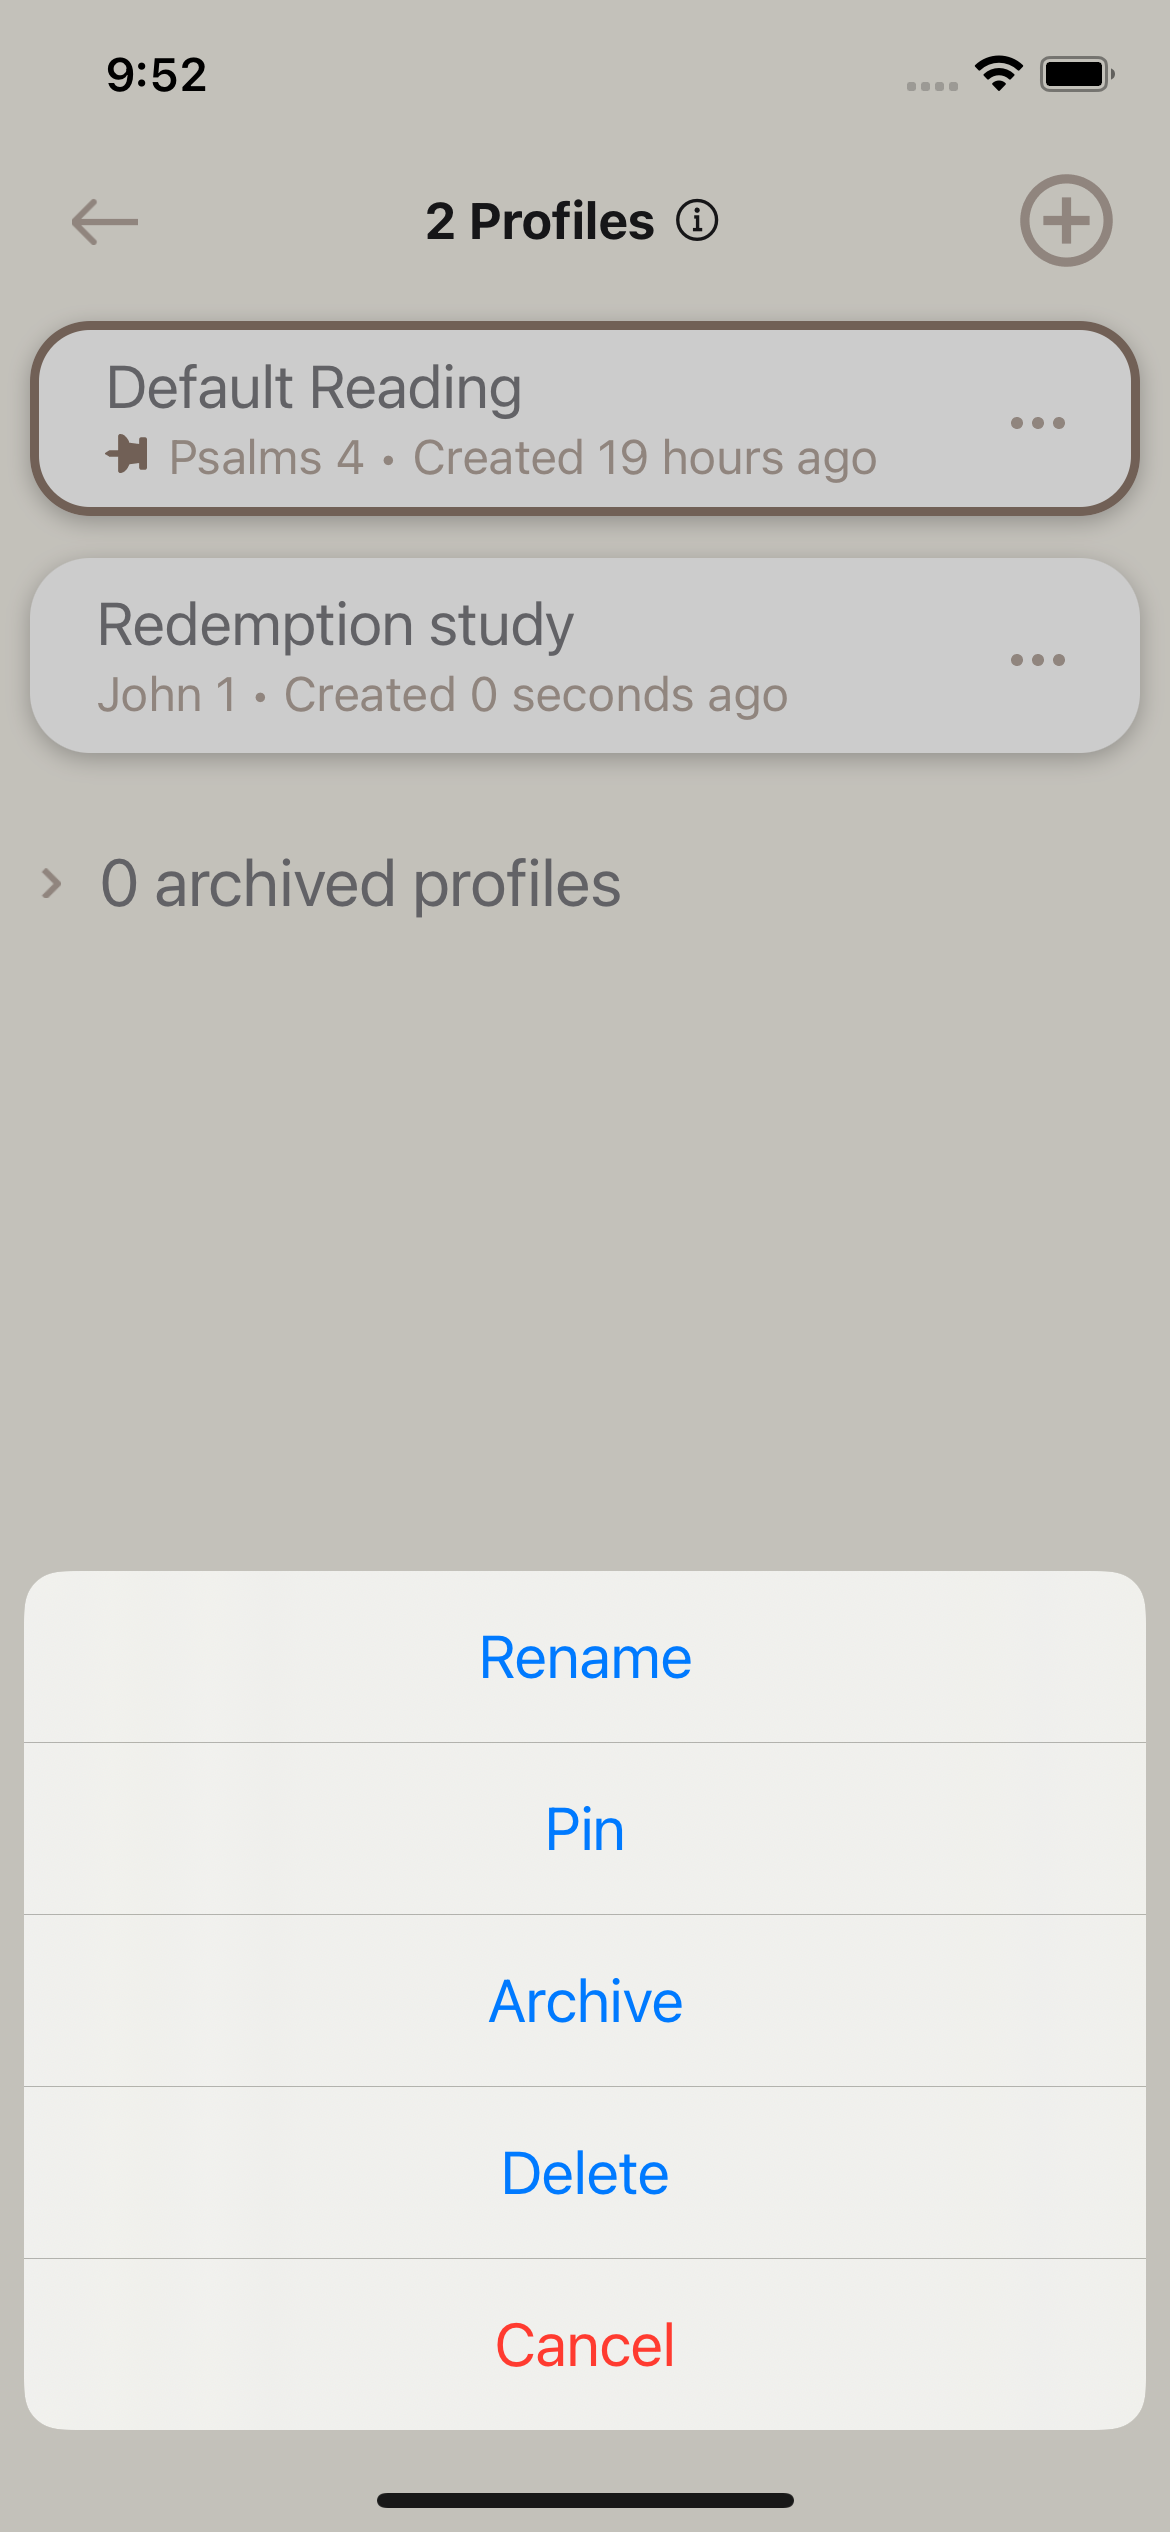
- In the profile page, tap on the triple dot icon on the profile that you wish to rename
- Select “Rename,” in the menu that comes up, change the profile name, and tap save.
Pin a profile

Note: Pinning a profile places the pinned profile at the top of your profile list. The default behavior when pinning a profile is that the latest pinned profile take the first place on the pinned list. However, if you have more than 1 pinned profile, the triple dot menu on each pinned profile will allow you to adjust its position on the list of pinned profiles.
- In the profile page, tap on the triple dot icon on the profile that you wish to pin.
- Tap Pin
Delete a profile

Note: You can only delete profiles if you have more than 1 profile.
- In the profile page, tap on the triple dot icon for the profile that you wish to delete
- Select “Delete,” in the menu that comes up and confirm your delete action.
Archive a profile

Note: You can archive a profile instead of deleting it. Archiving a profile moves that profile from the main list of profiles into the archived profiles list on the profiles page and stops annotations from that profile appearing on the annotations and bookmarks pages
- In the profile page, tap on the triple dot icon for the profile that you wish to archive
- Tap Archive
Un-archive a profile

- Scroll to the bottom of your list of profiles and tap “archived profile (s)” to expand the list of archived profiles.
- Tap on the triple dot icon for the profile that you wish to restore
- Tap restore in the menu that pops up
Advanced: customize profile reader behavior from its reader view (features menu)

Settings
The Settings page provides one location from which the user can change all the App’s settings. It also houses the Introduction to the Recovery Version, various pieces of information about the App, and an import and export function.

- The settings page:
- Export annotations
- Import annotations
- Manage global settings
- Manage all tab settings
Charts and Maps
The Charts and Maps page provides a listing of all the charts available in the Recovery Version and allows for easy viewing of them from one location.


- The Charts and maps listing page:
- Open a chart or map
- Zoom in and out on a chart or map
- Go back from charts and maps view
Deep Links / App Links
Scripture references within Living Stream Ministry ebooks (available through Google, Apple, Amazon, Barnes and Noble, and Kobo) are linked to the Holy Bible Recovery Version App. Once the App has been installed, tapping on a verse reference link in one of the readers for the platforms listed above should request that the link be opened through the App. The link schema is also published at …

- Setting the default profile for opening deep links
Troubleshooting
Some steps to attempt if nd when you run into problems with the App not being responsive
- Clearing the app cache
- Uninstalling and reinstalling the App
Frequently Asked Questions
Some steps to attempt if and when you run into problems with the App not being responsive
- Does the app support synchronization across multiple devices?
- No, the App does not support synchronization across multiple devices at this time
- Do I have to purchase the app to get its benefits even though I already own the Recovery Version on other platforms such as Kindle, Google Play Books, Apple Books, Kobo, or iSilo?
- Yes, the app is a separate purchase